Network file sharing protocols allow you to share files and directories from your computer with other devices on the network. Common protocols include SAMBA, NFS, and FTP.
Advantages of network sharing:
| Aspect | USB Copy | Messaging Apps | Network Sharing |
|---|---|---|---|
| Storage | Local duplicates | Multiple copies | Centralized, no duplicates |
| Management | Manual, error-prone | Scattered in chats | Centralized control |
| Media Usage | Full copy required | Full download needed | Streaming support |
| Collaboration | Physical transfer | File size limits | Real-time multi-access |
ZimaOS currently provides CLI and GUI support for SAMBA. In versions after 1.3.2, ZimaOS also integrates NFS functionality (at CLI level). This tutorial demonstrates how to use NFS on ZimaOS to share folders and access them from Windows, macOS, and Ubuntu.
You need to create or find a folder for sharing first. Here, I will use /DATA/C/demoas an example.
Edit the Configuration File
Use vi to edit the /etc/exportsfile, which is the configuration file for NFS.
- Obtain root privileges
you need to enter the ZimaOS web terminal and obtain the root privilege.
ZimaOS dashboard -> Settings -> General -> Developer mode -> Web-based terminal
Log in and switch to rootsudo -i
- Edit the configuration file
vi /etc/exports
- In the /etc/exports, paste this lineNote:
/DATA/C/demo *(rw,sync,no_subtree_check)
- The first column specifies the shared folder(e.g., /DATA/C/demo)
- The second column defines
- The subnet that has the permission to access
- e.g., 10.0.0.0/8
- The * stands for allowing accessing from all networks
- Allow Read and Write permission for network users(rw)
- Writing Method, usually sync or async is taken (sync in this case)
- No_subtree_check allows full access to the shared directory without subtree restrictions
- Refer to this: https://docs.redhat.com/en/documentation/red_hat_enterprise_linux/5/html/deployment_guide/s1-nfs-server-config-exports#s1-nfs-server-config-exports
It will work automatically, even after reboot.
Bring the Configuration File into Effect
In some cases,you may need to run this command in the shell to make the configuraion effective.
systemctl restart nfs-server |
or
exportfs -a |
Use(Mount/Unmount) the NFS Folders
On ZimaOS/Ubuntu
Tested on ZimaOS 1.3.2-beta2 and Ubuntu 22.04.5 LTS
- Here on a client machine
open Terminal
switch to root first
make a dir for mountingsudo -i
mkdir /mnt/demo - mount the nfs folder
this ip is the Server’s IPmount 10.0.0.71:/DATA/C/demo /mnt/demo
- Now you can view and use your sharing
you may want to remove the mounted NFS folders one day
Just check mounted foldersordf -h
mount | grep nfs
- unmount the nfs folders
umount /mnt/demo
On macOS
- Tested on macOS Sequoia on M4 Chip
make a directory for mountingmkdir ~/demo
- mount the nfs folder
you need to use sudo to mount
it will prompt you to input the passwordsudo mount -t nfs -o resvport 10.0.0.71:/DATA/C/demo ~/demo
- open the folder for using
open .
- you may want to remove the mounted NFS folders one day
Just check mounted foldersordf -h
mount | grep nfs
- unmount the nfs folders
sudo umount /mnt/demo
On Windows
Tested on Windows 11
you may need enter to CMD first
since the terminal may place you in Powershell by default on Windows 11cmd
You may need to change W: to an available character that is not occupied
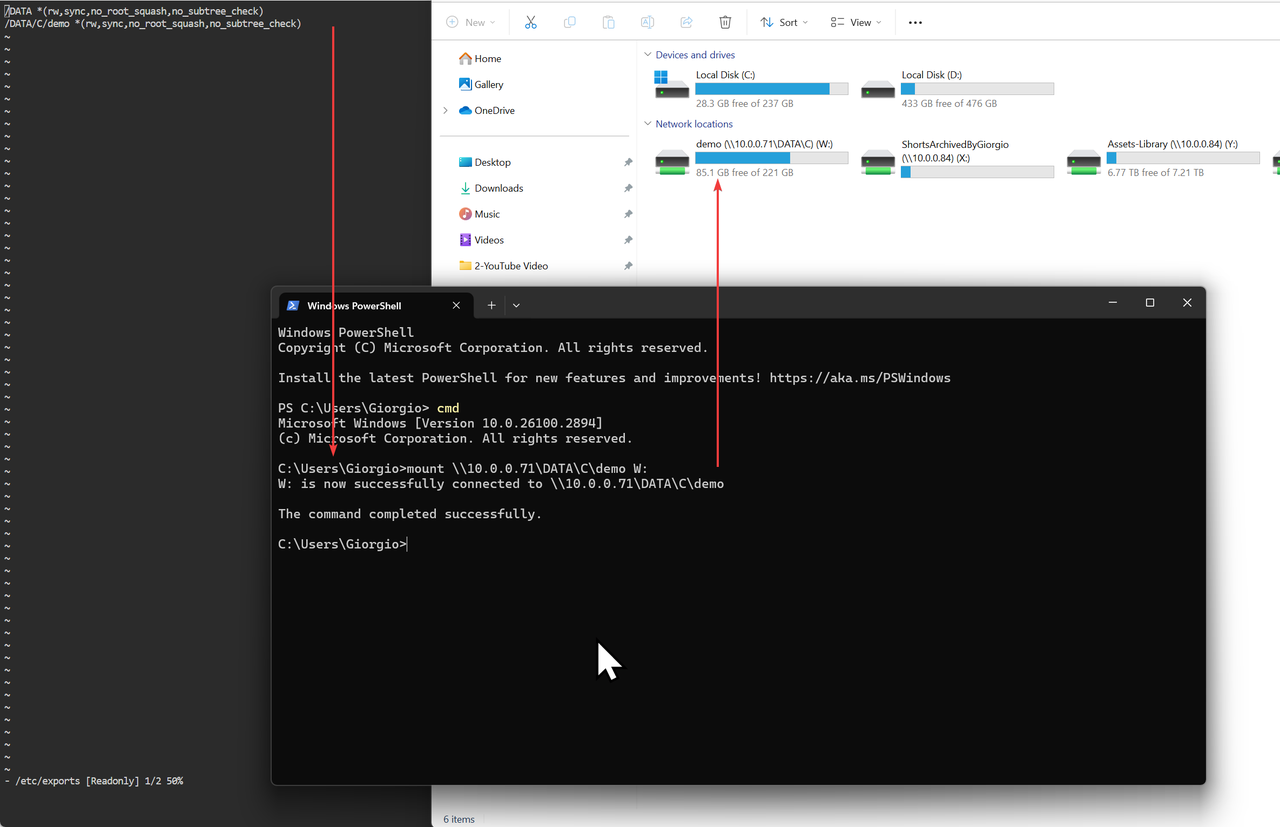
mount \\10.0.0.71\DATA\C\demo W:
Now you can view and use your sharing
you may want to remove the mounted NFS folders one day
Just check mounted foldersnet use
unmount the nfs folders
net use W: /delete
The screenshot after mounting on Windows:
Useful Tips
Here are some commands that you may need further.
On the ZimaOS server
- check the status of nfs-service
systemctl status nfs-server
- remove or comment out the line of /etc/exports to disable sharing
run this to make it effectiveorexportfs -a
systemctl restart nfs-server
If you encounter any issues during use, feel free to let us know at any time. You can also join our community and Discord to discuss more about NAS and ZimaOS. We look forward to your feedback!